
调用SDK展示虚拟人物模型,使用fetchEventSource进行SSE流式请求
调用SDK展示虚拟人物模型,使用fetchEventSource进行SSE流式请求
·
最近在做一个AI项目,需求是调用第三方的sdk展示虚拟人物+语音转文本,文本转语音,通过sse流式请求获取模型返回的数据。我们需要在模型返回全部数据后,前端才能接受并展示,一旦询问时间过长就会让用户等待很久,这时候我们需要将前端的展示效果改为ChatGPT那样的打字机效果。
为什么不用websocket?
websocket是双向的,不仅前端需要接受信息,后端也需要接受信息,但是像gpt我们询问的时候,只需要前端实时接受信息即可,后端不需要实时的接受前端信息,因此我们使用比websocket更加轻量的通信协议:EventStream。
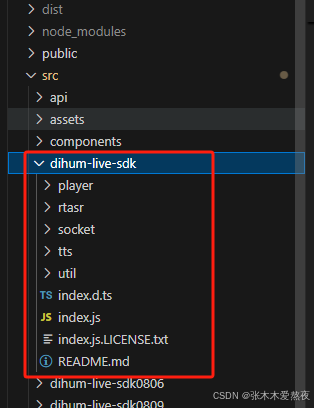
一、引入第三方的sdk
二、sdk的调用
在需要使用sdk的组件中引入。第三方提供的sdk肯定有相关api调用的方法文档。请查看他们提供的文档。
<div id="video-container""></div>
import * as Dihum from "../dihum-live-sdk";
data() {
      return {
     	 host: "http://xxxxxxx:xxxx/", // 模型地址
     	 channel: "",
	     player: new Dihum.Player(),
	     appId: "",
	     ASR_obj: null,
      }
},
created() {
      this.init();
      this.ASR_obj?.stop();
	  this.ASR_obj = new Dihum.AsrRecorder({ open: false }); // //asr收音相关
	  this.ASR_obj.init(); // //初始化,返回promise代表初始化完成
    },
methods:{
//返回promise代表初始化结束
async init() {
        const res = await Dihum.requestStreamUrl(this.host); // 获取基本配置信息
        this.channel = res.channel;
        this.appId = res.appid;
        await this.playerInit();
      },
      async playerInit() {
       //播放器相关
        await this.player.init({
          container: document.getElementById("video-container"),  //播放器容器id
          channel: this.channel,  //拉流频道
          appId: this.appId,  //appid
          host: this.host,   //请求域名
          processingOptions: {
            open: false, //端侧扣绿是否开启
            color: '', //扣绿颜色
            pixelRatio: 1 //扣绿画板和视频的分辨率比例,默认1,
          },
        });
        await this.player.requestInterrupt();  //朗读,返回promise
        await this.player.join();  //返回promise代表加入拉流频道成功
      },
}
<style scoped lang="scss">
#video-container {
  position: absolute;
  // right: 0;
  // width: 5rem;
  height: 10.8rem;
  height: 100%;
  z-index: 1;
}
</style>
三、EventStream用法。结合sdk。我只截取一些比较实用的代码,大家根据自己的业务逻辑来。
1、安装 Fetch Event Source。npm install @microsoft/fetch-event-source
2、在页面要有一个按钮触发
<div :class="tokening === true ? 'isDisabled2' : ''" @click="onSwitch_ASR">
                  <img class="imgToggle" src="../assets/333.png" alt=""  v-if="!ASR_activated">
                  <img class="imgToggle" src="../assets/555.gif" alt=""  v-else>
                </div>
3、引入fetchEventSource
import { fetchEventSource } from "@microsoft/fetch-event-source";
/** 切换语音识别状态 */
     onSwitch_ASR() {
      this.ASR_activated = !this.ASR_activated;
      if (this.ASR_activated) {
        this.player.requestInterrupt();
        this.ASR_obj?.start();
        this.ASR_obj.onTextChange = (text) => {
          this.recordText += text;
          console.log('触发语句',text);
          console.log('触发语句连接',this.recordText);
      }
      } else {
              setTimeout(()=>{
                if(this.recordText !== ''){
                  this.startSSE()
                  this.getQuestionRes(this.recordText)
                }
              },500)
          this.ASR_obj?.stop();
      }
    },
4、具体的可以自己去查下资料Fetch Event Source的用法和参数等。根据自己的业务逻辑去调整代码。我这里代码只粘贴了一部分并不完完整。
// SSE请求
    startSSE() {
      const payloadChica = {
        "api_key": "gAAAAABmsr9O0nh_w6vHY3SAgkWEgNjq01seHOi24hYwFN09jWOBkSRT5JlMeAMlXFScR9CoxXxcfIYRsK7lzGsiKKKqsyL15rJSvAWbgmNybCPCvwlYwWS9hxKZ2bj0tYbJAmsYByOR5MuZEVWbaXZaMgpveHChRQ==",
        "query": this.recordText, // 客户端提出的问题文本
        "session_id": this.conversationId ? this.conversationId : '' // 这里是AI问答需要带上的会话ID,会根据第一个问题的内容回答第二个问题。
      };
        this.searchValue = '';
          this.tokening = true;
          this.sseRequest(payloadChica, this.handleResponse, this.handleError);
    },
    // 使用sse获取对话列表
    sseRequest(payload,successCallback,errCallback){
      const controller = new AbortController();
      const signal = controller.signal;
      const url = 'https://xxx/xxx/api/AMiner/stream'; // 这个地址注意不能是代理地址,必须是https
      const headers = {
        "Content-Type": "application/json",
        Accept: "*/*",
      };
      // 设置超时时间为30秒
      const timeout = setTimeout(() => {
          controller.abort();
          const timeoutError = new Error('Request timed out');
          errCallback(timeoutError);
      }, 30000);
      fetchEventSource(url, {
        method: "POST",
        signal: signal,
        headers,
        body: JSON.stringify(payload),
          onmessage(msg) {
            clearTimeout(timeout); // 收到消息时清除超时计时器
            successCallback(msg);
          },
          onerror(err) {
            clearTimeout(timeout); // 出现错误时清除超时计时器
            // 必须抛出错误才会停止
            console.log("==eeeee==", err);
            errCallback?.(err);
            throw err;
          },
        });
    },
    // 成功、处理成功的数据
    handleResponse(msg) {
      const { data } = msg;
      const dataJson = JSON.parse(data);
      const { status, parts, conversation_id } = dataJson;
      // console.log(status, parts,conversation_id,dataJson,'返回成功数据');
      // 对成功返回的数据做处理
      const { text } = parts[0];
      if(status === "finish" || status === "error") {
        this.conversationId = conversation_id;
        if(text !== ''){
          this.responseText = text;
        }else{
          this.responseText = '内容生成失败,请重新提问';
        }
      }
      // console.log(this.messageList,this.responseText,'messageList对话');
    },
    // 失败、处理错误的数据
    async handleError(err) {
      // 处理错误
      const messageitem = this.messageList[this.messageList.length - 1];
        console.log(messageitem, "错误数据");
        // 对成功返回的数据做处理
      console.log(err,this.recordText,this.recordEvents,'错误的数据');
    },
5、打字机效果。我们自己封装了一个。各位大佬根据自己的业务看着用吧,根据自己的业务调整
<template>
  <div>
    <div
      v-if="!openWriter"
      ref="typeWriter"
      :class="{ 'type-writer-text': true, typing: isTyping }"
      v-html="typedText"
    ></div>
    <div
      v-else
      ref="typeWriter"
      class="type-writer-text"
      v-html="typedText"
    ></div>
  </div>
</template>

<script>
export default {
  props: {
    text: {
      type: String,
      required: true,
    },
    openWriter: {
      type: Boolean, // 改为布尔值类型
      required: true,
      default: false, // 可选:设置默认值
    },
    delay: {
      type: Number,
      default: 5,
    },
  },
  watch: {
    text(newVal,oldVal) {
      if(newVal !== oldVal) {
        this.typeWriter();
      }
    }
  },
  data() {
    return {
      isTyping: false,
      charIndex: 0,
      typedText: "",
      //   openWriter: false, //false 问答, true 历史
    };
  },
  created() {
    this.typeWriter();
  },
  methods: {
    htmlOlToMarkdown(html) {
      // 检查HTML字符串是否包含<ol>标签
      if (!html.includes("<ol>") || !html.includes("</ol>")) {
        return html; // 如果没有找到<ol>标签,直接返回原HTML字符串
      }
      // 创建一个临时的div元素,将HTML字符串插入其中
      const tempDiv = document.createElement("div");
      tempDiv.innerHTML = html;

      // 获取所有的li元素
      const listItems = tempDiv.querySelectorAll("li");

      // 初始化一个数组来存储Markdown格式的字符串
      let markdownArray = [];

      // 遍历每个li元素,提取内容并转换为Markdown格式
      listItems.forEach((item, index) => {
        // 获取li元素内的文本内容,包括子元素
        let textContent = item.textContent.trim();

        // 添加Markdown列表项前缀
        markdownArray.push(`${index + 1}. <strong>${textContent}</strong>`);
      });

      // 将数组转换为单一的Markdown字符串
      const markdownString = markdownArray.join("\n");

      // 返回Markdown格式的字符串
      return markdownString;
    },
    replaceOlLiWithDivsUsingRegex(html) {
      if (!html.includes("<ol>") || !html.includes("</ol>")) {
        return html; // 如果没有找到<ol>标签,直接返回原HTML字符串
      }
      const tempDiv = document.createElement("div");
      tempDiv.style.whiteSpace = "normal";
      // 替换<ol>标签为<div>
      html = html.replace(/<ol\b[^>]*>/gi, "<div>");

      // 替换</ol>标签为</div>
      html = html.replace(/<\/ol>/gi, "</div>");

      // 替换<li>标签为<div>
      html = html.replace(/<li\b[^>]*>/gi, "<div style='display:flex;'>");

      // 替换</li>标签为</div>
      html = html.replace(/<\/li>/gi, "</div>");
      tempDiv.innerHTML = html;
      return html;
    },
    typeWriter() {
      // console.log("this.text", this.text);
      this.newcontent = this.text.replace(/(\n){3,}$/g, "\n\n");
      // this.newcontent = newtext.replace(/\n/g, "<br>");
      // this.newcontent = newtext.replace(/\n/g, "<p></p>");
      if (this.openWriter) {
        this.typedText = this.replaceOlLiWithDivsUsingRegex(this.newcontent);
        return;
      }
      if (this.charIndex < this.newcontent.length) {
        this.isTyping = true;

        // 使用Vue.nextTick确保DOM更新后再执行动画逻辑
        this.$nextTick(() => {
          let char = this.newcontent.charAt(this.charIndex);
          this.typedText += char; // 更新typedText属性
          this.charIndex++;

          setTimeout(() => {
            this.typeWriter();
          }, this.delay);
        });
      } else {
        this.isTyping = false;
      }
    },
  },
};
</script>

<style lang="scss" scoped>
.type-writer-text {
  /* overflow: hidden; */
  min-height: 0.2rem;
  white-space: pre-wrap;
  line-height: 0.2rem;
  /* white-space: nowrap; */
  li {
    list-style: none !important;
    display: flex !important;
  }
}

.typing {
  animation: typing 0.5s steps(1), blink 0.7s step-end infinite;
}

@keyframes typing {
  from {
    width: 0;
  }
  to {
    width: 100%;
  }
}

@keyframes blink {
  50% {
    border-color: transparent;
  }
}
</style>
引入type-writer
<type-writer
     v-if="!answerItem.question"
     :text="answerItem.faqContent"
     :openWriter="historyType"
     :key="answerItem.id"
   />
import TypeWriter from "./TypeWriter.vue";
components: {
TypeWriter
}

电影级数字人,免显卡端渲染SDK,十行代码即可调用,工业级demo免费开源下载!
更多推荐

 6
6 0
0- 0


 已为社区贡献1条内容

所有评论(0)