
springboot 自定义starter
文章目录一、starter启动原理二、自定义starter1、say-spring-boot-starter-autoconfigure(自动配置包)①、项目结构②、pom文件③、实体类 DialogBean④、业务类 SayService⑤、自动配置类 SayServiceAutoConfiguration⑥、配置使用 META-INF/spring.factories2、say-spring-
一、starter启动原理
-
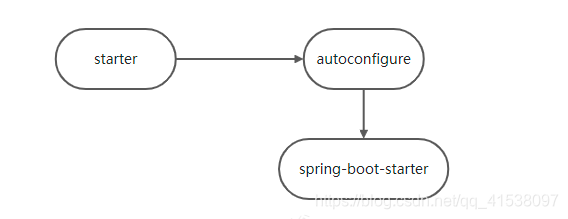
starter-pom引入 autoconfigurer 包
-
autoconfigure包中配置使用 META-INF/spring.factories 中 EnableAutoConfiguration 的值,使得项目启动加载指定的自动配置类
-
编写自动配置类 xxxAutoConfiguration -> xxxxProperties
- @Configuration
- @Conditional
- @EnableConfigurationProperties
- @Bean
…
引入starter — xxxAutoConfiguration — 容器中放入组件 ---- 绑定xxxProperties ---- 配置项
二、自定义starter
1、say-spring-boot-starter-autoconfigure(自动配置包)
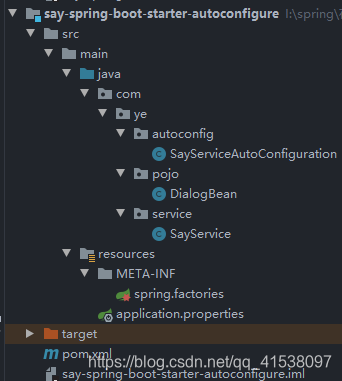
创建一个 springboot 项目 say-spring-boot-starter-autoconfigure
①、项目结构
②、pom文件
我就引入了一个 lombok ,简写实体类,spring-boot-starter 是 springboot 自带的
	<dependencies>
		<dependency>
			<groupId>org.springframework.boot</groupId>
			<artifactId>spring-boot-starter</artifactId>
		</dependency>

		<dependency>
			<groupId>org.projectlombok</groupId>
			<artifactId>lombok</artifactId>
			<optional>true</optional>
		</dependency>
	</dependencies>
③、实体类 DialogBean
使用 @ConfigurationProperties(prefix = “ye.dialog”) 绑定 application.yml 中的 ye.dialog 配置
@Data
@ConfigurationProperties(prefix = "ye.dialog")
public class DialogBean {
    private String name;
    private String words;
}
④、业务类 SayService
这块不需要使用 @Service 加入容器,通过后面的自动配置类注入容器
public class SayService {

    private boolean flag;
    @Autowired
    DialogBean dialogBean;

    public String say() {
        if (flag) {
            return dialogBean.getName() + ":姨给你来个唱跳rap,你看满意不";
        }
        return dialogBean.getName() + ":" + dialogBean.getWords();
    }

    public void setFlag(boolean flag) {
        this.flag = flag;
    }
}
⑤、自动配置类 SayServiceAutoConfiguration
如果你有多个自定义组件,可以注入多个 Bean
- @Configuration 表明配置类
- @Bean 注册组件 SayService
- @EnableConfigurationProperties(DialogBean.class)
- EnableConfigurationProperties 让 @ConfigurationProperties 注解生效
- @EnableConfigurationProperties + @ConfigurationProperties(在DialogBean 实体类使用) 注册组件,这样步骤 ④ 的 @Autowired 就可以拿到 DialogBean 组件
- @ConditionalOnMissingBean(SayService.class),如果 DialogBean 组件不在容器中则执行下面方法
@Configuration
@EnableConfigurationProperties(DialogBean.class)
public class SayServiceAutoConfiguration {

    @Bean
    @ConditionalOnMissingBean(SayService.class)
    public SayService addSayService(){
        return new SayService();
    }
}
⑥、配置使用 META-INF/spring.factories
在根目录 resources下新建文件 spring.factories 文件,查看 springboot 的 factories 文件,仿照配置如下,其中 \ 代表换行,写在一行也可以,不美观
# Auto Configure
# 必要,写死的
org.springframework.boot.autoconfigure.EnableAutoConfiguration=\
# 你的配置类
com.ye.autoconfig.SayServiceAutoConfiguration
最后 clean,install 安装到 maven 仓库
2、say-spring-boot-starter(启动器)
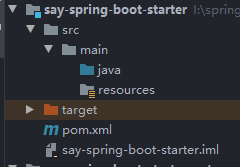
创建一个maven项目 say-spring-boot-starter,引入 say-spring-boot-starter-autoconfigure 自动配置
①、项目结构
②、pom 文件
只需要导入自动配置依赖即可,该项目也可以定义一些功能,可自行实现
    <dependency>
        <groupId>com.ye</groupId>
        <artifactId>say-spring-boot-starter-autoconfigure</artifactId>
        <version>1.0.0</version>
    </dependency>
clean, install 安装到 maven 仓库
三、测试自定义 starter
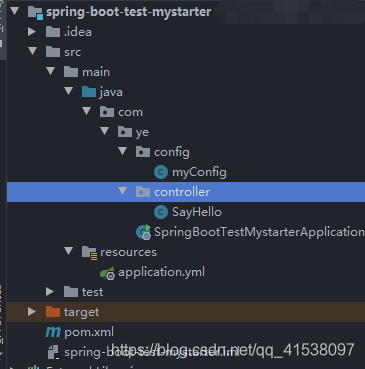
新建一个 springboot 项目,用于测试上面自定义的 starter
1、项目结构
2、 pom 文件
注意导入你自己的依赖,版本信息
        <dependency>
            <groupId>org.springframework.boot</groupId>
            <artifactId>spring-boot-starter-web</artifactId>
        </dependency>

        <dependency>
            <groupId>com.ye</groupId>
            <artifactId>say-spring-boot-starter</artifactId>
            <version>1.0.0</version>
        </dependency>
3、application.yml 配置
ye:
  dialog:
    name: 张姨
    words: 来,姨给你设个话
4、 controller 测试
@RestController
public class SayHello {

    @Autowired
    SayService sayService;

    @GetMapping(value = "/say")
    public String say(){
        return sayService.say();
    }
}
自动装配正常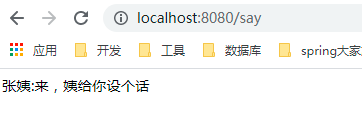
5、自定义 Bean
自定义 Bean,修改默认配置,个性化设置
@Configuration
public class myConfig {

    @Bean
    SayService mySayService(){
        SayService sayService = new SayService();
        sayService.setFlag(true);
        return sayService;
    }
}
个性化定制成功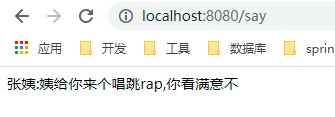
如上就是 springboot 自定义starter 的全部过程,项目比较简单,适合于新手入门,大佬轻喷

电影级数字人,免显卡端渲染SDK,十行代码即可调用,工业级demo免费开源下载!
更多推荐

 4
4 0
0- 0


 已为社区贡献2条内容

所有评论(0)